# createApp
Vue3.0和Vue2.0 创建应用的区别
// 2.0
import Vue from 'vue'
// 全局混入
Vue.minxin()
// 注册全局指令
Vue.directive('focus', {})
// 注册全局组件
Vue.component('my-component-name', { /* ... */ })
// 注册插件
Vue.use()
//绑定的全局方法和变量
Vue.prototype.xxx = xxx
// 挂载
new Vue({
    router,
    render:(h)=> h(App)
}).$mount(root)
// 3.0
import Vue from 'vue'
const app = Vue.createApp({})
// 混
app.mixin()
// 注册全局组件
app.component('SearchInput', SearchInputComponent)
// 注册全局指令
app.directive('focus', FocusDirective)
// 注册插件
app.use(LocalePlugin)
// 添加全局属性
app.config.globalProperties.$message = message
app.mount('#counter')
3.0 将通过 Vue.createApp({}).mount('#counter') 创建一个应用并挂载实例,并在这个实例上面注册一些全局API
接下来分别看下 createApp 和 mount 方法的定义
# app创建
createApp 在源码中的定义:
  const createApp = ((...args) => {
    const app = ensureRenderer().createApp(...args);
    {
      injectNativeTagCheck(app);
    }
    const { mount } = app;
    app.mount = (containerOrSelector) => {
     // mount 方法
    };
    return app;
  })

  function ensureRenderer() {
    // 这一步说明 renderer 只有一个,renderer 是通过 createRenderer 创建
    // rendererOptions 是一些处理 DOM 元素相关的方法
    return renderer || (renderer = createRenderer(rendererOptions));
  }

  function createRenderer(options) {
    return baseCreateRenderer(options);
  }

function baseCreateRenderer(){
    // 定义了一些操作更新 VNode 的一些方法
    return {
      render,
      hydrate,
      createApp: createAppAPI(render, hydrate)
    }
}
从上面代码可以看到首先是通过 createRenderer 创建的一个 renderer, 这个renderer 只包含了三个属性
render: 创建VNode方法hydrate: 是否服务渲染的标识createApp: 通过createAppAPI(render, hydrate)返回一个创建Vue应用实例的方法
createAppAPI(render, hydrate) 定义如下:
  function createAppAPI(render, hydrate) {
    // rootComponent 正常就是我们传入的根 vue 组件
    return function createApp(rootComponent, rootProps = null) {
      if (rootProps != null && !isObject(rootProps)) {
        warn(`root props passed to app.mount() must be an object.`);
        rootProps = null;
      }
      // 创建当前 app 的上下文, 说白了就是存一些配置信息的一个对象,这个对象包含了 app、config、mixins、components、directives、provides属性
      const context = createAppContext();
      const installedPlugins = new Set();
      let isMounted = false;
      const app = (context.app = { // 创建一个 app 应用并保存到 context.app 中
        _uid: uid$1++,
        _component: rootComponent,
        _props: rootProps,
        _container: null,
        _context: context,
        version,
        get config() {
          return context.config;
        },
        set config(v) {
          {
            warn(`app.config cannot be replaced. Modify individual options instead.`);
          }
        },
        use(plugin, ...options) {
          if (installedPlugins.has(plugin)) {
            warn(`Plugin has already been applied to target app.`);
          }
          else if (plugin && isFunction(plugin.install)) {
            installedPlugins.add(plugin);
            plugin.install(app, ...options);
          }
          else if (isFunction(plugin)) {
            installedPlugins.add(plugin);
            plugin(app, ...options);
          }
          else {
            warn(`A plugin must either be a function or an object with an "install" ` +
              `function.`);
          }
          return app;
        },
        mixin(mixin) {
          {
            if (!context.mixins.includes(mixin)) {
              context.mixins.push(mixin);
              // global mixin with props/emits de-optimizes props/emits
              // normalization caching.
              if (mixin.props || mixin.emits) {
                context.deopt = true;
              }
            }
            else {
              warn('Mixin has already been applied to target app' +
                (mixin.name ? `: ${mixin.name}` : ''));
            }
          }
          return app;
        },
        component(name, component) {
          {
            validateComponentName(name, context.config);
          }
          if (!component) {
            return context.components[name];
          }
          if ( context.components[name]) {
            warn(`Component "${name}" has already been registered in target app.`);
          }
          context.components[name] = component;
          return app;
        },
        directive(name, directive) {
          {
            validateDirectiveName(name);
          }
          if (!directive) {
            return context.directives[name];
          }
          if ( context.directives[name]) {
            warn(`Directive "${name}" has already been registered in target app.`);
          }
          context.directives[name] = directive;
          return app;
        },
        mount(rootContainer, isHydrate) {
          if (!isMounted) {
            const vnode = createVNode(rootComponent, rootProps);
            // store app context on the root VNode.
            // this will be set on the root instance on initial mount.
            vnode.appContext = context;
            // HMR root reload
            {
              context.reload = () => {
                render(cloneVNode(vnode), rootContainer);
              };
            }
            if (isHydrate && hydrate) {
              hydrate(vnode, rootContainer);
            }
            else {
              render(vnode, rootContainer);
            }
            isMounted = true;
            app._container = rootContainer;
            rootContainer.__vue_app__ = app;
            {
              devtoolsInitApp(app, version);
            }
            return vnode.component.proxy;
          }
          else {
            warn(`App has already been mounted.\n` +
              `If you want to remount the same app, move your app creation logic ` +
              `into a factory function and create fresh app instances for each ` +
              `mount - e.g. \`const createMyApp = () => createApp(App)\``);
          }
        },
        unmount() {
          if (isMounted) {
            render(null, app._container);
            {
              devtoolsUnmountApp(app);
            }
          }
          else {
            warn(`Cannot unmount an app that is not mounted.`);
          }
        },
        provide(key, value) {
          if ( key in context.provides) {
            warn(`App already provides property with key "${String(key)}". ` +
              `It will be overwritten with the new value.`);
          }
          // TypeScript doesn't allow symbols as index type
          // https://github.com/Microsoft/TypeScript/issues/24587
          context.provides[key] = value;
          return app;
        }
      });
      return app;
    };
  }
createAppAPI 方法返回的是 createApp 方法,也就是说 Vue.createApp(CounterApp).mount('#counter') => const app = ensureRenderer().createApp(...args), 实际上执行的就是这里返回的 createApp 方法
从上面代码可以看到 createApp 返回一个 app 对象,这个对象就是返回的 vue 应用实例,这个对象定义了 use、mixin、component、mount等方法让我们可以添加全局方法、插件、组件等
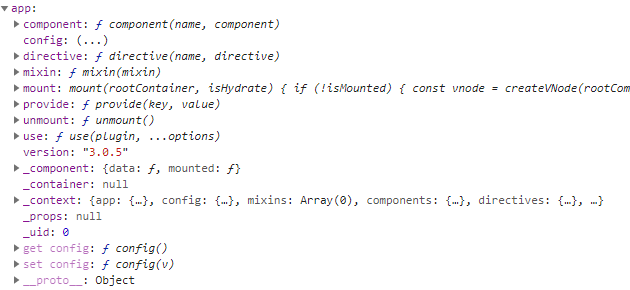
至此, app 的创建大概捋了下,整个过程就是利用闭包创建一个对象, 一个app 的包含的属性如下图:
接下来看下 mounted 方法的调用,看下应用怎么挂载的
# mounted
mounted 是 app 中的属性,定义如下:
mount(rootContainer, isHydrate) {
  if (!isMounted) {
    const vnode = createVNode(rootComponent, rootProps);
    // store app context on the root VNode.
    // this will be set on the root instance on initial mount.
    // vnode.appContext 保存 当前 app 的属性信息
    vnode.appContext = context;
    // HMR root reload
    {
      context.reload = () => {
        render(cloneVNode(vnode), rootContainer);
      };
    }
    if (isHydrate && hydrate) {
      hydrate(vnode, rootContainer);
    }
    else {
      render(vnode, rootContainer);
    }
    isMounted = true;
    app._container = rootContainer;
    rootContainer.__vue_app__ = app;
    {
      devtoolsInitApp(app, version);
    }
    return vnode.component.proxy;
  }
  else {
    warn(`App has already been mounted.\n` +
      `If you want to remount the same app, move your app creation logic ` +
      `into a factory function and create fresh app instances for each ` +
      `mount - e.g. \`const createMyApp = () => createApp(App)\``);
  }
},
mounted 重点做两件事:
createVNode(rootComponent, rootProps): 创建 VNode, 暂不细究这里render(vnode, rootContainer):渲染组件
大致看下 render 方法:
// render
const render = (vnode, container) => {
  if (vnode == null) {
    if (container._vnode) {
      unmount(container._vnode, null, null, true);
    }
  }
  else {
    patch(container._vnode || null, vnode, container);
  }
  flushPostFlushCbs();
  container._vnode = vnode;
}
render 中执行 patch 方法,patch 也是 diff VNode节点的地方,这里是加载根元素,所以在 patch 方法内执行 processComponent(n1, n2, container, anchor, parentComponent, parentSuspense, isSVG, optimized) 方法,此的参数为:
n1:
nulln2: 上文创建的 VNode 对象
container: 要挂载的 DOM 元素
其它参数均为
null或false
const processComponent = (n1, n2, container, anchor, parentComponent, parentSuspense, isSVG, optimized) => {
  if (n1 == null) {
    if (n2.shapeFlag & 512 /* COMPONENT_KEPT_ALIVE */) {
      parentComponent.ctx.activate(n2, container, anchor, isSVG, optimized);
    }
    else {
      mountComponent(n2, container, anchor, parentComponent, parentSuspense, isSVG, optimized);
    }
  }
  else {
    updateComponent(n1, n2, optimized);
  }
}
processComponent 内部再执行 mountComponent(n2, container, anchor, parentComponent, parentSuspense, isSVG, optimized) 方法
const mountComponent = (initialVNode, container, anchor, parentComponent, parentSuspense, isSVG, optimized) => {
  // 创建组件实例
  const instance = (initialVNode.component = createComponentInstance(initialVNode, parentComponent, parentSuspense));
  if ( instance.type.__hmrId) {
    registerHMR(instance);
  }
  {
    // 将当前vnode 添加到全局栈 stack 中
    pushWarningContext(initialVNode);
    startMeasure(instance, `mount`);
  }
  // inject renderer internals for keepAlive
  if (isKeepAlive(initialVNode)) {
    instance.ctx.renderer = internals;
  }
  // resolve props and slots for setup context
  {
    startMeasure(instance, `init`);
  }
  // 通过组件属性(data, compunted, watch 等),组装组件实例
  setupComponent(instance);
  {
    endMeasure(instance, `init`);
  }
  // setup() is async. This component relies on async logic to be resolved
  // before proceeding
  if ( instance.asyncDep) {
    parentSuspense && parentSuspense.registerDep(instance, setupRenderEffect);
    // Give it a placeholder if this is not hydration
    // TODO handle self-defined fallback
    if (!initialVNode.el) {
      const placeholder = (instance.subTree = createVNode(Comment));
      processCommentNode(null, placeholder, container, anchor);
    }
    return;
  }
  setupRenderEffect(instance, initialVNode, container, anchor, parentSuspense, isSVG, optimized);
  {
    popWarningContext();
    endMeasure(instance, `mount`);
  }
};
mountComponent 方法先是通过 createComponentInstance 创建一个对象,这里暂时取名就组件实例对象,源码:
  function createComponentInstance(vnode, parent, suspense) {
    // 获取 type, type是当前根组件信息,下面是一个type的例子
    // data: ƒ data()
    // mounted: ƒ mounted()
    // render: ƒ render(_ctx, _cache)
    // template: "↵    Counter: {{ counter }}↵"
    // __emits: null
    // __props: []
    // __proto__: Object

    const type = vnode.type;
    // vnode.appContext 是 createApp方法中,定义的上下文,粟:
    // app: {_uid: 0, _component: {…}, _props: null, _container: null, _context: {…}, …}
    // components: {}
    // config: {performance: false, globalProperties: {…}, optionMergeStrategies: {…}, isNativeTag: ƒ, isCustomElement: ƒ, …}
    // directives: {}
    // mixins: []
    // provides: {}
    // reload: () => {…}

    const appContext = (parent ? parent.appContext : vnode.appContext) || emptyAppContext;
    // 创建一个 instance 对象
    const instance = {
      uid: uid$2++,
      vnode,
      type,
      parent,
      appContext,
      root: null,
      next: null,
      subTree: null,
      update: null,
      render: null,
      proxy: null,
      exposed: null,
      withProxy: null,
      effects: null,
      provides: parent ? parent.provides : Object.create(appContext.provides),
      accessCache: null,
      renderCache: [],
      // local resovled assets
      components: null,
      directives: null,
      // resolved props and emits options
      propsOptions: normalizePropsOptions(type, appContext),
      emitsOptions: normalizeEmitsOptions(type, appContext),
      // emit
      emit: null,
      emitted: null,
      // state
      ctx: EMPTY_OBJ,
      data: EMPTY_OBJ,
      props: EMPTY_OBJ,
      attrs: EMPTY_OBJ,
      slots: EMPTY_OBJ,
      refs: EMPTY_OBJ,
      setupState: EMPTY_OBJ,
      setupContext: null,
      // suspense related
      suspense,
      suspenseId: suspense ? suspense.pendingId : 0,
      asyncDep: null,
      asyncResolved: false,
      // lifecycle hooks
      // not using enums here because it results in computed properties
      isMounted: false,
      isUnmounted: false,
      isDeactivated: false,
      bc: null,
      c: null,
      bm: null,
      m: null,
      bu: null,
      u: null,
      um: null,
      bum: null,
      da: null,
      a: null,
      rtg: null,
      rtc: null,
      ec: null
    };
    {
      instance.ctx = createRenderContext(instance);
    }
    // root 指定当前 instance
    instance.root = parent ? parent.root : instance;
    instance.emit = emit.bind(null, instance);
    {
      devtoolsComponentAdded(instance);
    }
    return instance;
  }
createRenderContext 的方法定义如下:
  function createRenderContext(instance) {
    const target = {};
    // expose internal instance for proxy handlers
    Object.defineProperty(target, `_`, {
      configurable: true,
      enumerable: false,
      get: () => instance
    });
    // expose public properties
    Object.keys(publicPropertiesMap).forEach(key => {
      Object.defineProperty(target, key, {
        configurable: true,
        enumerable: false,
        get: () => publicPropertiesMap[key](instance),
        // intercepted by the proxy so no need for implementation,
        // but needed to prevent set errors
        set: NOOP
      });
    });
    // expose global properties
    const { globalProperties } = instance.appContext.config;
    Object.keys(globalProperties).forEach(key => {
      Object.defineProperty(target, key, {
        configurable: true,
        enumerable: false,
        get: () => globalProperties[key],
        set: NOOP
      });
    });
    return target;
  }
createRenderContext 方法的目的就是给当前组件 insatcne 代理一些方法:
$el、$data、$attrs、$props等等包括使用
app.config.globalProperties添加的全局属性和方法,也在这里做了代理
createComponentInstance 执行完后返回当前创建的 instance,回到 mountComponent 方法中,接下直接看 setupRenderEffect(instance, initialVNode, container, anchor, parentSuspense, isSVG, optimized); 方法的调用
const setupRenderEffect = (instance, initialVNode, container, anchor, parentSuspense, isSVG, optimized) => {
  // create reactive effect for rendering
  instance.update = effect(function componentEffect() {
   // componentEffect 代码
  },  createDevEffectOptions(instance) );
};
// createDevEffectOptions 返回四个属性
function createDevEffectOptions(instance) {
  return {
     scheduler: queueJob,
     allowRecurse: true,
     onTrack: instance.rtc ? e => invokeArrayFns(instance.rtc, e) : void 0,
     onTrigger: instance.rtg ? e => invokeArrayFns(instance.rtg, e) : void 0
  };
}
上面给 instance.update 赋值一个 effect,先看下 effect 的定义,终于来了一个重点:这里的 effect 相当于 vue2.0的 watcher
  // effect
  function effect(fn, options = EMPTY_OBJ) {
    if (isEffect(fn)) {
      fn = fn.raw;
    }
    // 中式翻译:创建响度式效果
    // effect 是个函数
    const effect = createReactiveEffect(fn, options);
    if (!options.lazy) {
      // 执行 effect
      effect();
    }
    return effect;
  }
// createReactiveEffect: 创建一个 effect 函数
  function createReactiveEffect(fn, options) {
    const effect = function reactiveEffect() {
      if (!effect.active) {
        return options.scheduler ? undefined : fn();
      }
      // effectStack 是个全局属性,收集 effect
      if (!effectStack.includes(effect)) {
        cleanup(effect); // 清除 effect.deps 中收集到的 effect,当前是首次挂载根组件,所以 deps 是没东西中
        try {
          // 启动跟踪, 往全局属性 trackStack 添加一个 true
          enableTracking();
          effectStack.push(effect); // 添加当前的 effect 到 effectStack 数组中
          activeEffect = effect; // activeEffect 为全局属性,保存当前的 effect
          return fn(); // 执行回调, 即 componentEffect 方法
        }
        finally {
          // 渲染完成后将当前的 effect 推出
          effectStack.pop();
          resetTracking();
          activeEffect = effectStack[effectStack.length - 1];
        }
      }
    };
    effect.id = uid++;
    effect.allowRecurse = !!options.allowRecurse;
    effect._isEffect = true;
    effect.active = true;
    effect.raw = fn;
    effect.deps = []; // 看到了个奇怪的属性,在vue2中 deps是跟事件收集有关系的东西
    effect.options = options;
    return effect;
  }
// cleanup
  function cleanup(effect) {
    const { deps } = effect;
    if (deps.length) {
      for (let i = 0; i < deps.length; i++) {
        deps[i].delete(effect);
      }
      deps.length = 0;
    }
  }
  let shouldTrack = true;
  const trackStack = [];
  function pauseTracking() {
    trackStack.push(shouldTrack);
    shouldTrack = false;
  }
  function enableTracking() {
    trackStack.push(shouldTrack);
    shouldTrack = true;
  }
当执行的 effect 的时候,将当前 effect 保存到全局,最后执行回调 fn 即 componentEffect 方法渲染组件到DOM,这部分的过程先不细究,这里就完成了组件一次渲染同时在渲染过程中问到依赖的属性时,全局的 effect 就被当前的属性收集
# 组件更新
接下来大概分析当属性更新时,如果重新触发组件的更新
当属性更新时,被 proxy 的 set 劫持,执行 trigger(target, "set" /* SET */, key, value, oldValue) 方法,这个方法就是取出收集的 effect 执行 effect.options.scheduler(effect) 方法
回到上文找到scheduler 方法定义的位置,在 setupRenderEffect 中的 createDevEffectOptions 中
const setupRenderEffect = (instance, initialVNode, container, anchor, parentSuspense, isSVG, optimized) => {
  // create reactive effect for rendering
  instance.update = effect(function componentEffect() {
   // componentEffect 代码
  },  createDevEffectOptions(instance) );
};
// createDevEffectOptions 返回四个属性
function createDevEffectOptions(instance) {
  return {
     scheduler: queueJob,
     allowRecurse: true,
     onTrack: instance.rtc ? e => invokeArrayFns(instance.rtc, e) : void 0,
     onTrigger: instance.rtg ? e => invokeArrayFns(instance.rtg, e) : void 0
  };
}
//queueJob
  function queueJob(job) {
    // the dedupe search uses the startIndex argument of Array.includes()
    // by default the search index includes the current job that is being run
    // so it cannot recursively trigger itself again.
    // if the job is a watch() callback, the search will start with a +1 index to
    // allow it recursively trigger itself - it is the user's responsibility to
    // ensure it doesn't end up in an infinite loop.
    if ((!queue.length ||
      !queue.includes(job, isFlushing && job.allowRecurse ? flushIndex + 1 : flushIndex)) &&
      job !== currentPreFlushParentJob) {
      queue.push(job);
      queueFlush();
    }
  }
根据上文, scheduler 的作用就是将当前 effect 添加到微任务队列 queue 中,执行 queueFlush();, 待事件循环清理
  function queueFlush() {
    if (!isFlushing && !isFlushPending) {
      isFlushPending = true;
      currentFlushPromise = resolvedPromise.then(flushJobs);
    }
  }
  function flushJobs(seen) {
    isFlushPending = false;
    isFlushing = true;
    {
      seen = seen || new Map();
    }
    flushPreFlushCbs(seen);
    // Sort queue before flush.
    // This ensures that:
    // 1. Components are updated from parent to child. (because parent is always
    //    created before the child so its render effect will have smaller
    //    priority number)
    // 2. If a component is unmounted during a parent component's update,
    //    its update can be skipped.
    queue.sort((a, b) => getId(a) - getId(b));
    try {
      for (flushIndex = 0; flushIndex < queue.length; flushIndex++) {
        const job = queue[flushIndex];
        if (job) {
          if (true) {
            checkRecursiveUpdates(seen, job);
          }
          callWithErrorHandling(job, null, 14 /* SCHEDULER */);
        }
      }
    }
    finally {
      flushIndex = 0;
      queue.length = 0;
      flushPostFlushCbs(seen);
      isFlushing = false;
      currentFlushPromise = null;
      // some postFlushCb queued jobs!
      // keep flushing until it drains.
      if (queue.length || pendingPostFlushCbs.length) {
        flushJobs(seen);
      }
    }
  }
  function callWithErrorHandling(fn, instance, type, args) {
    let res;
    try {
      res = args ? fn(...args) : fn();
    }
    catch (err) {
      handleError(err, instance, type);
    }
    return res;
  }
最终会执行的 job 回调, 加成一下 createReactiveEffect 方法的调用
根据上文中的 scheduler 的调用, effect.options.scheduler(effect)
  function createReactiveEffect(fn, options) {
    const effect = function reactiveEffect() {
      if (!effect.active) {
        return options.scheduler ? undefined : fn();
      }
      if (!effectStack.includes(effect)) {
        cleanup(effect);
        try {
          enableTracking();
          effectStack.push(effect);
          activeEffect = effect;
          return fn();
        }
        finally {
          effectStack.pop();
          resetTracking();
          activeEffect = effectStack[effectStack.length - 1];
        }
      }
    };
    effect.id = uid++;
    effect.allowRecurse = !!options.allowRecurse;
    effect._isEffect = true;
    effect.active = true;
    effect.raw = fn;
    effect.deps = [];
    effect.options = options;
    return effect;
  }
可以看到队列中的的 job 就是 reactiveEffect, reactiveEffect 执行 fn 回调 即 componentEffect 方法渲染组件
好像跑题了~